Tutorial 02 - Setting up
Goals
- Establish a sensible folder structure
- Install python and nept
- Introduction to git and GitHub
- Download a data set and test your path setup
Establish a sensible folder structure
So far, you have a local nept repository, with code common to many analyses. As you work on your own project, you will write your own analysis code that may not be relevant to others. You will also have data files for each project. We can now consider where all of these files can go and how you will manage them. We recommend using two main locations:
- Code. Repositories (folders) here are linked to remote GitHub
repositories (either public or private). This may mean that some
project code repositories depend on other repositories, which is
fine. Just be aware that you need to keep your code up-to-date in
every location where it is used (by doing
git pull). - Data. Data should not be put on GitHub because it takes up a lot of space and never changes, so it does not benefit from being tracked with the version control of git. Raw data should be in a separate location on your computer than where your code lives, but processed data and intermediate files can be in a folder within your project code as long as you specify git to ignore that location within your .gitignore file.
If you are an owner or collaborator of a GitHub repository, such as when you make a repository for your own project, you will be able to push changes you make and manage the repository as you like. Generally, when you want to contribute to another repository, you can make your changes in a Fork of the repository and create a pull request. These pull requests allows the maintainers to see your code and ask for changes before it is merged into master, which helps to ensure that the code in master is working and stable.
Install python and nept
Python is a free and open-source programming language, with a core language and many additional useful scientific libraries. Follow the getting started directions in nept, our lab’s codebase, if you wish to make this tutorial interactive. Any code in this tutorial can be modified and run in the Jupyter notebook.
Introduction to git and GitHub
GitHub is a platform for distributed version control. So, you can get access to the latest codebase and it provides a platform for you to submit changes should you find any bugs or desire improvements to what is currently available.
If you don’t already have an account, you can make one here. And GitHub provides some (free) benefits to educators and students, check out if you qualify for them here.
There are
many
excellent
resources
dedicated to showing beginners how to effective use git and GitHub, so
take a moment to go through those if they’re unfamiliar to you. After
going through those, you should be familiar with the commands
status, push, pull, add, commit, and have some idea
of how git and GitHub track changes so you know when your code is saved
under version control.
Get a data session from the vandermeerlab server
Use a FTP client such as Filezilla to connect to the lab FTP server, using the following settings:
- Host: LAB SERVER IP
- Protocol: “FTP - File Transfer Protocol”
- Encryption: “Use explicit FTP over TLS if available”
- Logon Type: “Normal”
- User: LAB USER NAME
- Passwork: LAB PASSWORD
Note, contact us for the lab server ip, user, and password.
If you cannot log in to the server, send me your IP address and I will enable access for you. If you still can’t login, try changing the Filezilla login settings to use “FTP” as the Protocol, “Use explicit FTP over TLS if available”, and Logon Type “Normal”.
For these tutorials you will need the /datavault/nept-tutorials data files copied into the data folder in your copy of nept/tutorials/data. In general, you will want to keep your data separate from your code, but for simplicity for these tutorials we ensure these folders are NOT tracked by git and can be accessed the same for everyone by putting them in a common relative location (nept/tutorials/data/). A reason to generally keep your data separate from your code is that multiple analysis projects may use the same data and you don’t want to duplicate it.
In [1]:
# import necessary packages
%matplotlib inline
import os
import sys
import nept
import matplotlib.pyplot as plt

# Define where your data folder is located
data_path = os.path.join(os.path.abspath('.'), 'data')
data_folder = os.path.join(data_path, 'R016-2012-10-03')
In [2]:
# Load the info file, which contains experiment-specific information
sys.path.append(data_folder)
import r016d3 as info
In [3]:
# Load LFP (.ncs) from rat ventral striatum
lfp = nept.load_lfp(os.path.join(data_folder, info.lfp_theta_filename))

# Slice the LFP to [2000, 2001]
sliced_lfp = lfp.time_slice(2000, 2001)

# Plot the data
plt.plot(sliced_lfp.time, sliced_lfp.data)
plt.show()
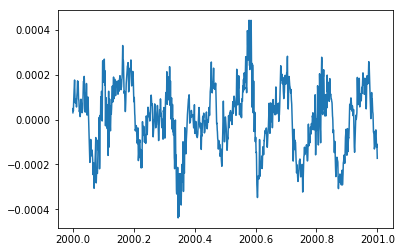
If you see the local field potential (LFP) plotted, then great job! Next, let’s get more into how we represent our neural data.